MotionRecorder Quickstart Guide
- Start MotionRecorder application
- Place phone in the desired recording location in a stable way - using a tripod is recommended. Adjust zoom by swiping the up/down to get the best possible composition.
- Change motion sensitivity settings, if necessary (see Motion sensitivity adjustment below)
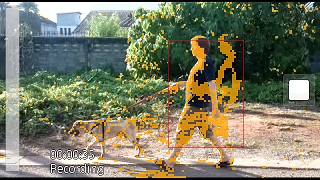
- Press record button to start waiting for movement. Status in the bottom of the screen will display Starting... for and then change to Waiting.... When movement is detected, the motion indicator in the left side of the screen rises to the max, recording is started and the status changes to Recording. Elapsed video recording time is displayed above the status text.
All of the movement happening in front of the camera is recorded to a video file, whose name consists of date and time when the app was started, for example Mr_20130529_165644.mp4. Recording date and time, updated every second, is written to a .srt subtitle file with the same name. Many video players, for example VLC, will automatically display the subtitles when opening a video file.
The videos will be viewable in the phone's Gallery or Videos application. Alternatively, the files can be accessed via a file manager. In C drive, videos are written to subfolders of C:\Data\MotionRecorder, and in other drives, subfolders of MotionRecorder in the drive root.
Motion sensitivity adjustment
MotionRecorder has two settings affecting motion detection. Depending on location, amount of light, and size of expected movement, the settings may need to be adjusted for optimal performance. It's best to start adjustment with the default value (50) for both settings.
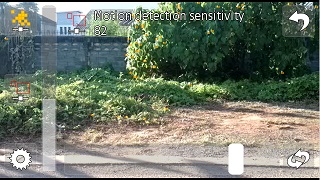
Simulate expected type of movement in front of the camera. Adjust the settings, starting with Pixel change sensitivity, so that the movement is easily detected, but the motion indicator (white bars in the left side of the screen) does not stay too close to the max when there's no movement.
Motion sensitivity settings explained
Pixel change sensitivity
Detected pixel changes are marked with small orange squares over the viewfinder. Pixel change sensitivity determines how much a pixel's color needs to change between consequent video frames to make the pixel detected as changed.
Motion detection sensitivity
Motion detection sensitivity determines how big percentage of pixel changes in an area is required to detect motion and start recording. Areas with detected motion are marked with a red rectangle around the area.
