SCam Menu Grid
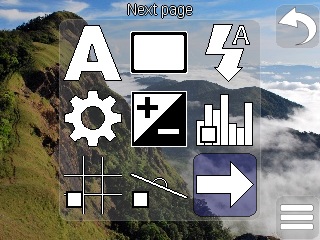
1. Preset
Selecting a preset changes all camera settings to values defined for that preset. Affected settings include autofocus mode and shutter speed, as well as camera settings that are controlled from the grid. User interface settings, such as Histogram and Viewfinder grid are not affected.
2. Capture mode
Capture mode specifies whether a single photo or multiple photos should be taken, whether the photos should be taken with or without a delay and if there should be changes to exposure between the photos. Additional settings for the selected capture mode, where needed, will appear after the capture setting in the menu grid. Capture modes currently supported are:
- Single photo. The default mode, takes a single photo is taken when capture is requested.
- Self timer. A single photo is taken after delay determined by the Timer delay setting.
- Continuous. Photos are taken as fast as the device hardware allows, until stop capture is requested
- Time lapse. Photos are taken, with a delay between the captures determined by the Timer delay setting, until stop capture is requested
- Motion detection (single). Application waits until motion is detected in the viewfinder and takes one photo. Motion sensitivity setting controls how much motion is required to trigger the capture.
- Motion detection (continuous). A photo taken every time motion is detected from the viewfinder, until the user requests stop capture.
- Exposure bracketing. Three photos are taken, one with current exposure, one with increased exposure compensation and one with decreased exposure compensation. Exposure compensation change between the photos can be set via the Exp. adjustment setting.
3. Flash
Flash setting determines the flash mode used when taking photos. Selecting Off disables flash altogether, in Auto mode flash is fired if the resulting photo would otherwise be too dark, and in On mode flash is fired always when a photo is taken. In Red eye mode flash is fired once before taking the photo and again for a second time while actually taking the photo, in order to avoid red eyes due to flash.
4. Settings
Opens settings view for changing application settings, including camera in use, device orientation and image quality. Settings view can also be opened from options menu.
5. Exposure compensation
Exposure compensation setting can be used to adjust exposure of the image. If the viewfinder's important parts look too dark, exposure can be increased, and if they are too bright, exposure can be decreased. Histogram can be used to aid in determining the need for exposure compensation. It's best to adjust exposure compensation after focusing and with the final image composition in place.
Note: The unit used in the setting slider is that of values internally used by the device, not EV units. For most devices, the rightmost slider value is somewhat equal to +2 EV, and leftmost value to -2 EV.
6. Histogram
If Histogram is enabled, a realtime histogram is calculated from viewfinder images and drawn to the top-left corner of the screen. Histogram be used as an aid when adjusting exposure compensation - a high peak in either in the leftmost column (dark colors) or rightmost column (bright colors) means that image information is being lost.
7. Viewfinder grid
Viewfinder grid divides the viewfinder in 3 parts, both horizontally and vertically, to assist composing your photos according to the rule of thirds.
8. Horizon line
Horizon line is a line parallel to the horizon, determined using the device's accelerometer. Useful for situations where horizon may not be clearly visible, but photos should be straight or in a given angle relative to horizon.
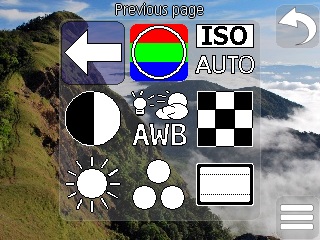
9. Color effect
Used to toggle between color effects supported by the device's camera hardware. The most common effects are Black and white, Sepia, Negative and vivid.
10. ISO rate
ISO rate corresponds sensitivity of the film used in traditional film cameras. Higher ISO rate means photos can be taken faster or in less light, but increasing ISO also increases amount of noise in the images. Auto works well for most situations.
11. Contrast
Adjusts the contrast of the image. Increasing contrast makes dark colors darker and bright colors brighter. Decrasing contrast does the opposite, with extremely low contrast making the whole image look greyish.
12. White Balance
Manually setting white balance may sometimes be necessary to aid the camera in making colors appear correctly with light from different sources, eg. to make whites look white instead of orange or blueish. Setting values besides Auto include Daylight and Cloudy for outdoors, and Tungsten and Fluorescent for indoors.
13. Sharpness
Adjusts the sharpness of the image. Increasing sharpness makes the captured photos look sharper, but also adds noise.
14. Brightness
Adjusts the brightness of the image. Consider using exposure compensation instead, if the setting is available.
15. Saturation
Adjusts the saturation of the colors in the image. With increased saturation, colors become more pure and vivid, decrasing saturation makes the image gradually black and white.
16. Crop marker
If enabled, draws a rectangle of selected aspect ratio in the center of the viewfinder. Useful, for example, when composing the view for a time lapse video, which needs to use an aspect ratio not supported by the device (eg. 16:9 widescreen for older devices). The resulting images can then be batch-cropped on a computer.
Note: All settings are not available on all devices.
